
What is Caching?
Caching is one of the most powerful tools & terminology to store and manage frequently accessed data in a way that allows for faster retrieval and improved performance. The basic idea behind Caching is to temporarily store copies of data that is expensive to generate or retrieve so that future requests for the same data can be served more quickly.
In simple words, Caching can make your WordPress website fast. Like, really fast.
Let’s start!
What is WordPress Caching?
Caching is the process of storing data and files in a cache. When a user visits your webpage, the content is delivered faster since the browser already store the necessary data and files in cache and it doesn’t need to retrieve the entire site from scratch.
And That’s caching in a nutshell.
Caching Types:
There are different types of caching each suited to different scenarios and requirements:
- Browser Caching: When you visit a website, your browser can cache static assets like images, CSS files, and JavaScript to avoid downloading them again when you revisit the site. This reduces page load times.
- Page Caching: You may have already heard of Page Caching where the browser stores static HTML versions of a page. Page Caching is often used in content management systems and web applications. Entire HTML pages are stored in cache to avoid regenerating the page with each request.
- Object Caching stores entire objects, such as data structures or database records, in memory. This is useful for frequently accessed data that can be costly to recreate or fetch from a database. This process involves storing database queries to serve a specific piece of data on the subsequent server request. As a result, there will be fewer queries sent to the database.Object caching is a type of server-side caching. This term means that the cache is stored on the server, not on the user’s browser (as with client-side caching).
Let’s break down the process:
- When a user visits the Website, the browser sends a data request to the Website Hosting Server.
- The Hosting Server receives the request and delivers the data and/or object to the browser.
If you have object caching enabled on your site, the Hosting Server will create a copy of this request in your cache. - When a similar request is made again, it will be served from the cache rather than the database.
Therefore, object caching minimizes the network bandwidth, the Hosting Server uses every time to query the database. Object Caching when configured properly, can reduce the load on your Hosting Server, thus saving the valuable network bandwidth and time. Therefore, it can lead to faster loading times and a smoother User Experience (UX).
Why Caching is required?
For large websites with heavy user traffic, caching for WordPress become more critical to ensure fast load times and an overall better visitor experience. Further many caching plugins readily available to handle all the heavy lifting, simple to configure.
- To ensure a happy user experience
WordPress caching is very important to ensure the good performance of your site with a great user experience. As the HTML Pages in WordPress gets generated dynamically, caching feature make sure that frequently accessed site pages – such as the Home page – are stored in memory, so at the time of repeated request, they load much faster. - To Reduce the load on your server
For a smaller hosting setup, caching is a boon. Caching reduces I/O operations and saves server memory, which reduces the extra load of network request. - To have a better google ranking
Just like everyone else, Google likes a fast-performing Website. In fact, one of the main ranking factors in Google’s search engine results pages is, the speed and responsiveness of your site. It encourages better user experience by rewarding sites that respond more quickly and load faster by giving them a higher page ranking as compare to other similar type of websites.
How to Enable Cache manually in WordPress
Enabling caching in WordPress can significantly improve the performance and load times of your website. Here’s how you can manually enable caching on your WordPress site:
Step 1: Make sure that you have the access to the ‘public_html’ folder which can be accessed either by login to your cPanel account or through FTP/SFTP login account using FileZilla application software.
Step 2: After login, Locate the ‘public_html’ folder. You will see the wp-config.php in this folder. Open the wp-config.php file of your website.
Step 3: Edit the line that says
define (‘WP_CACHE’, false);
And change it to:
define(‘WP CACHE’, true);
How to enable WordPress Caching using Plugin
There are several ways and multiple different plugins to enable caching in WordPress. WP Rocket and WP Super Cache are two commonly known plugins for their domain specific expertise. One of the features that makes these plugins super easy to use is, once you activate it within few clicks, you’re ready to go.
Here’s how you can do it.
Caching through WP Rocket
- First, you need to install and activate the WP Rocket plugin.
- Once activated, the WP Rocket plugin will automatically turn on the page and browser caching with optimal settings for your site.
- You can see your site’s caching status by visiting the WP Rocket dashboard under the WordPress Settings » WP Rocket page or you can refer menu at the top >> and locate WP Rocket link

Once you land on the WP Rocket Dashboard, you can see the Cache tab on the left menu » Cache.

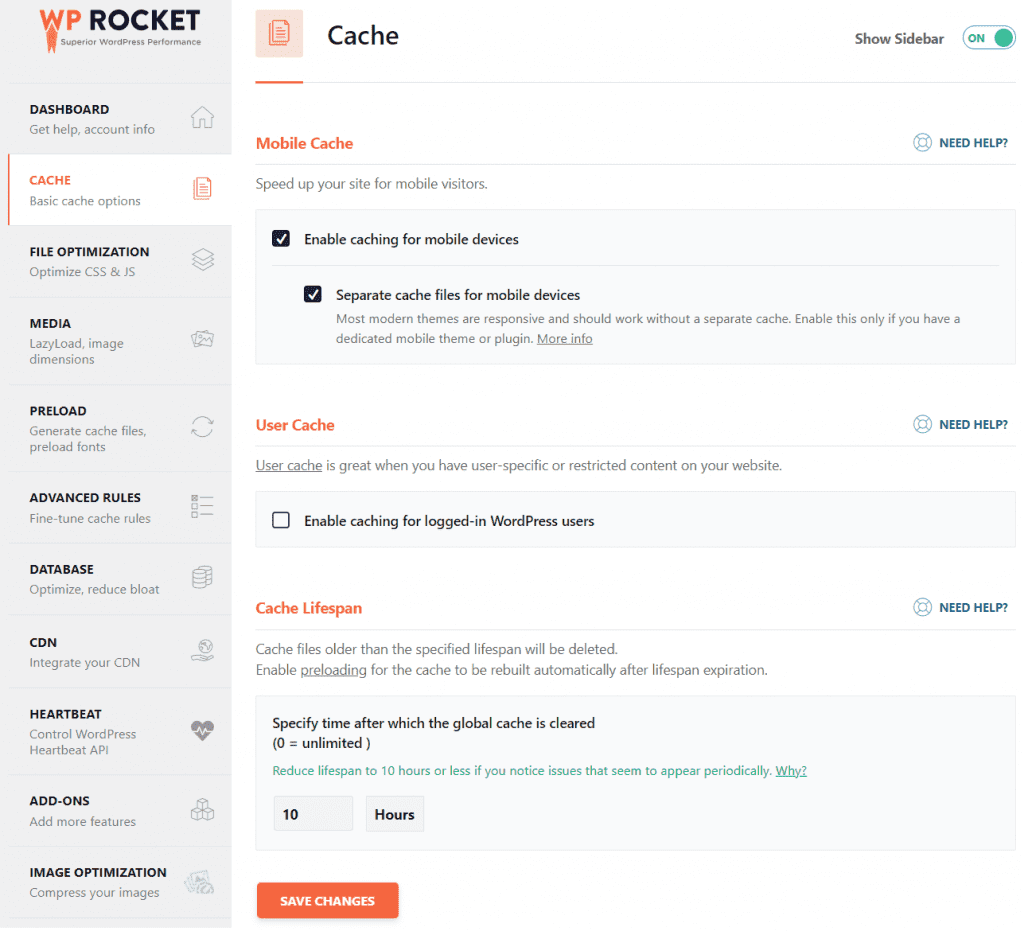
In addition to automatically enabling page and browser caching, WP Rocket will activate by default Mobile Cache and Cache lifespan (10 hours). In this tab, you can customize the settings according to your needs.
Caching through WP Super Cache:
WP Super Cache can help optimize your WordPress site to load faster and use fewer server resources. The following steps are important to understand the working with WP Super Cache:
- Install the Plugin: Log in to your WordPress dashboard. Go to “Plugins” and click on “Add New.” Search for “WP Super Cache” and install the plugin. Activate the plugin. After activation, go to “Settings” and click on “WP Super Cache.”
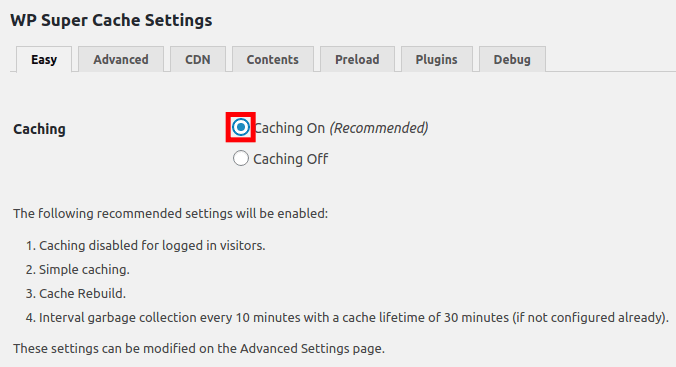
- Configure WP Super Cache: Check Caching Settings:
In the “Easy” tab, select “Caching On” and click “Update Status” Advanced Settings (Optional): You can go to the “Advanced” tab to configure more advanced settings if needed.
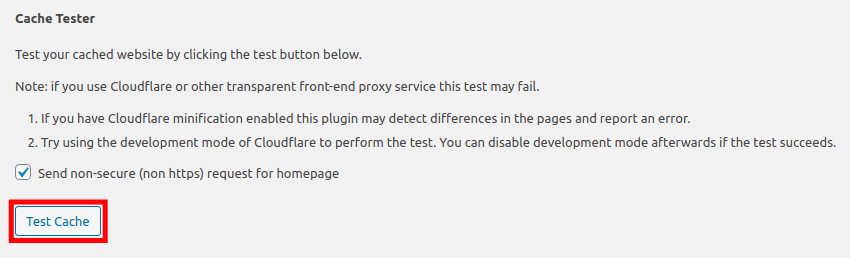
Test Your Site:
Visit your website in an incognito or private browsing window to check if caching is working appropriately. You should see faster load times.
Please note that configuring caching plugins can vary depending on your hosting server environment and specific needs. Make sure to test all important webpages of your site thoroughly to ensure everything is loading as expected. Also, consider clearing your cache time to time whenever any plugin version gets upgraded or any other significant changes to your website to avoid serving outdated content to your visitors.
Wrapping up
Caching is important player in successful and faster loading of your website.
Website caching is the best way to speed up your WordPress website without sacrificing content or other performance factors. When properly implemented, it will result in much quicker response to your users while minimizing the extra bandwidth load on your hosting server.
If you’re not caching your WordPress website already, it’s time to get started.
For any technical queries, you can always reach us at info@wordpromise.com